- Empty cart.
- Tiếp tục mua sắm
Instructions for installing an international travel eSIM for iPhone, Samsung, and Google Pixel
- Posted on
sim du lịch
- 0
- Danh mục:Du lịch nước ngoài cần chuẩn bị những gì?,eSIM du lịch quốc tế và những điều cần biết,Tin tức

Are you preparing for an international trip and want to stay connected without worrying about buying a physical SIM card? A travel eSIM is the perfect solution! With an eSIM, you can easily connect to the Internet, make calls, and send messages when you arrive in any country. In particular, installing an eSIM on devices like iPhone and Samsung is now incredibly simple. With just a few easy steps, let’s learn with SIM2GO how to install eSIM on iPhone and Samsung to make your journey even more convenient and seamless!
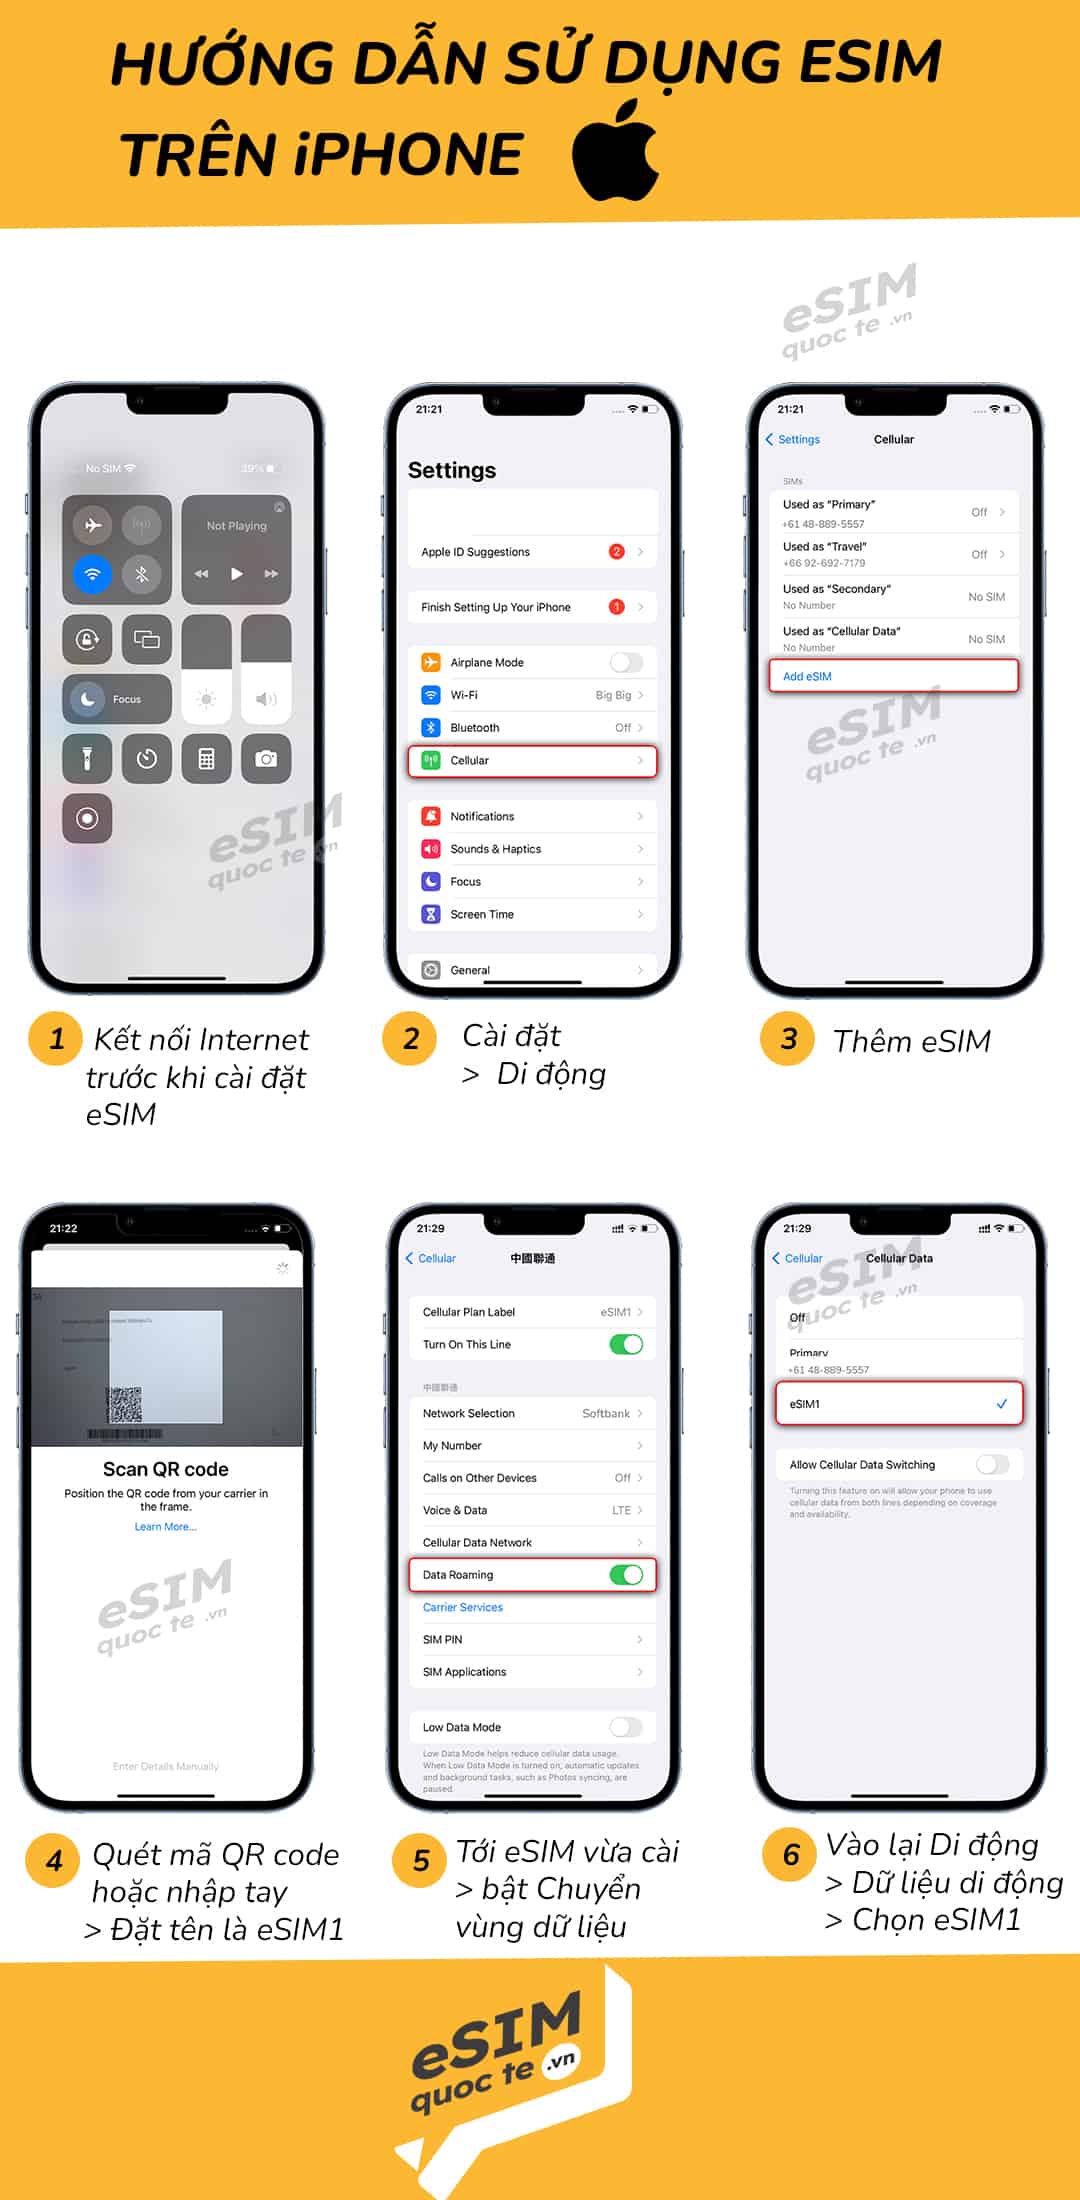
1. How to install a travel eSIM and turn on international roaming on an iPhone
1.1. Instructions for installing an international travel eSIM on an iPhone (requires an internet connection)
There are two ways to install a travel eSIM on your iPhone:
(1) Install by scanning the QR code.
(2) Install manually using the SM-DP+ address and activation code.
1.1.1. Instructions for installing an international travel eSIM on an iPhone by scanning the QR code
- Step 1: Go to Settings > Select Cellular
- Step 2: Select Add eSIM
- Step 3: Select Use QR code and scan the eSIM QR code sent to you by SIM2GO

Installing an international travel eSIM on an iPhone by scanning the QR code
1.1.2. Instructions for installing an international travel eSIM on an iPhone manually
- Step 1: Go to Settings > Select Cellular
- Step 2: Select Add eSIM
- Step 3: Select Use QR code
- Step 4: Select Enter Details Manually
- Step 5: Enter the SM-DP+ address and activation code sent by SIM2GO with the QR eSIM
Installing a travel eSIM on an iPhone manually
1.2. Instructions for turning on Data Roaming on an iPhone
- Step 1: Go to Settings > Select Cellular
- Step 2: Select the travel eSIM you have installed on your device
- Step 3: Turn on This Line > Enable Data Roaming, and you’re all set!

1.3. Instructions for choosing a travel eSIM as the Primary Data SIM on an iPhone
- Step 1: Go to Settings > Select Cellular
- Step 2: Turn on your travel eSIM (if you don’t know how to turn on travel eSIM, please refer to section 1.2) > Select Cellular Data
- Step 3: Select the travel eSIM as the primary cellular data SIM > Turn off Allow Cellular Data Switching. Then, you’re ready to explore the world with SIM2GO!

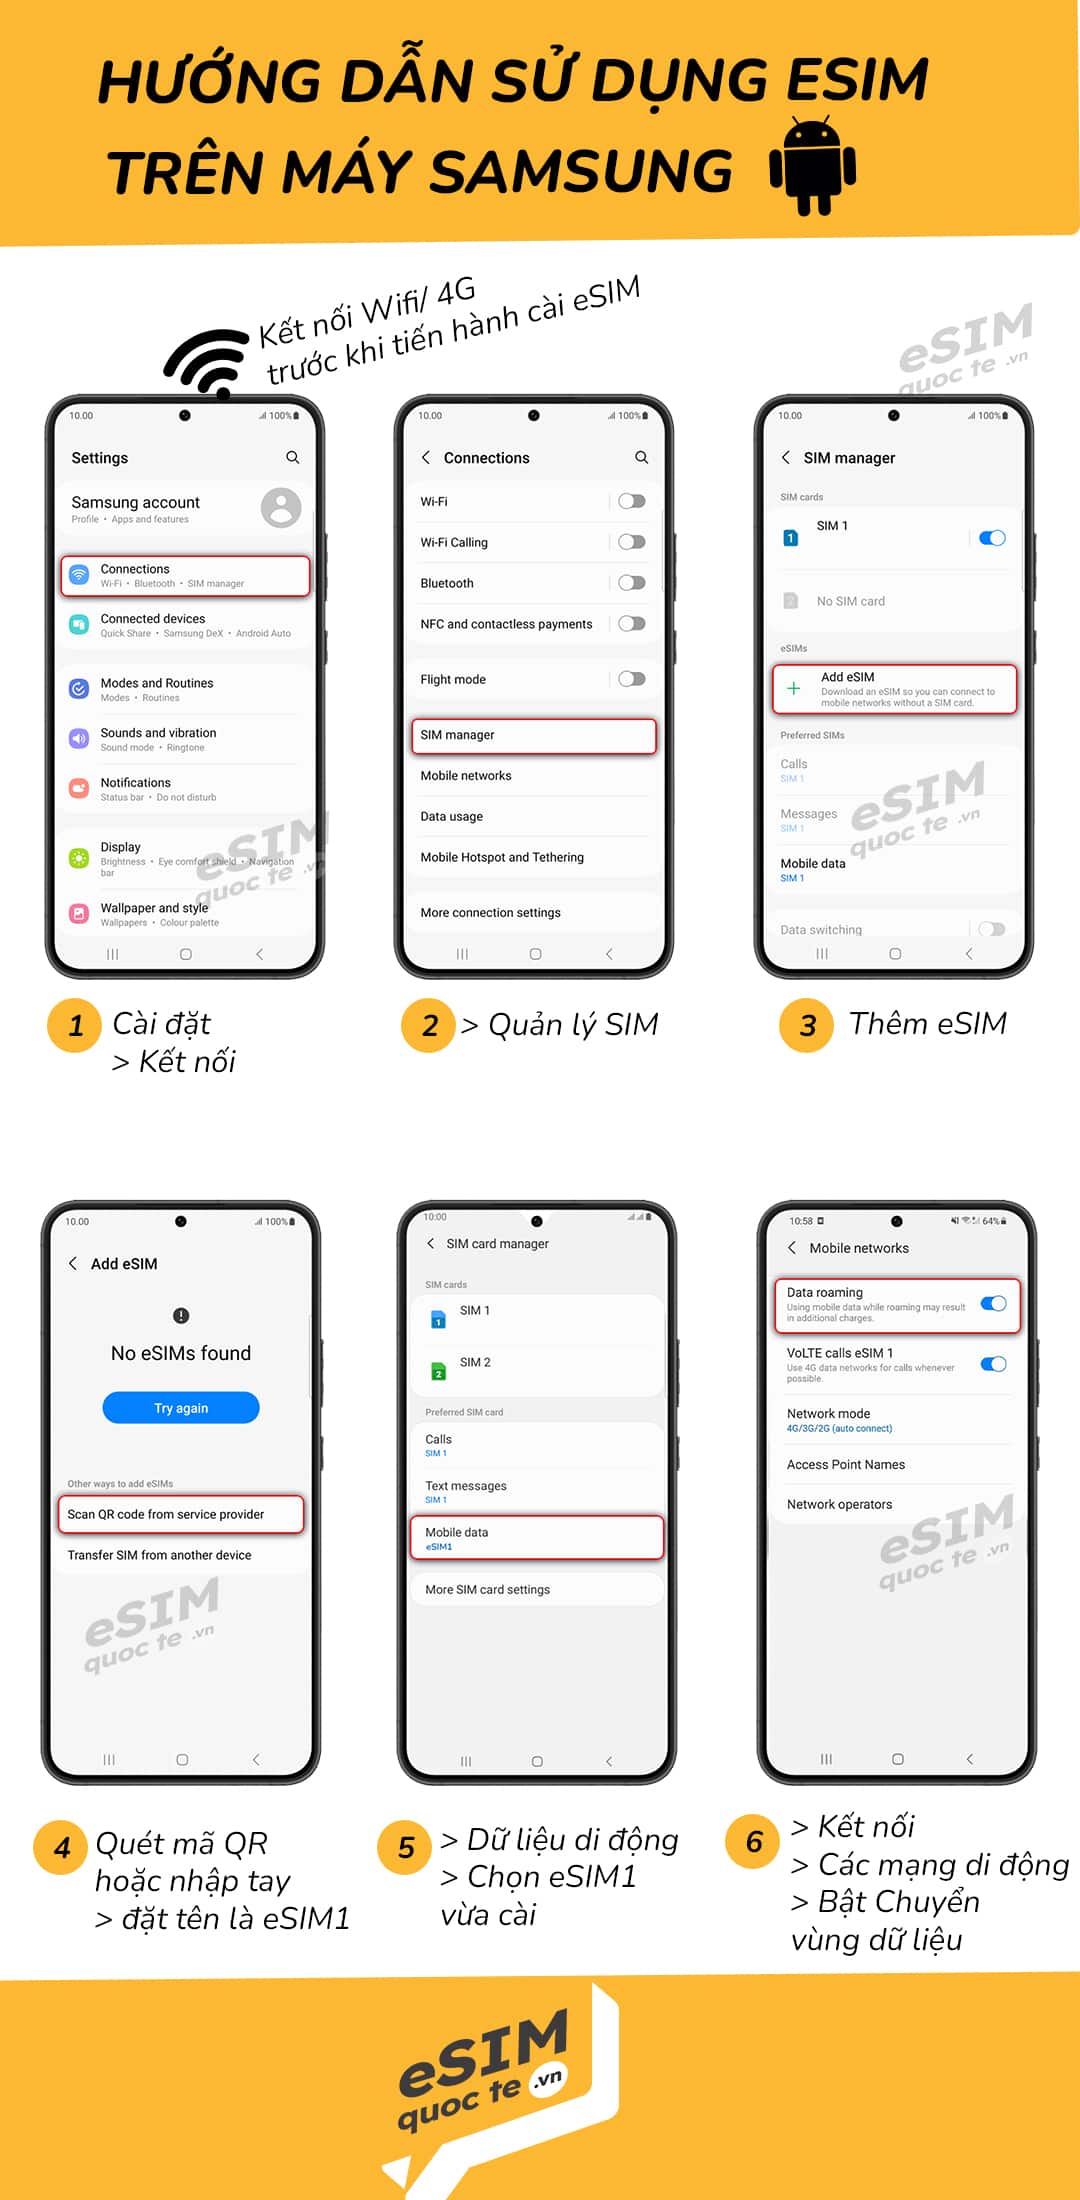
2. How to install a travel eSIM and turn on international roaming on a Samsung
2.1. Instructions for installing an international travel eSIM on a Samsung (requires an internet connection)
For Samsung phones, there are three ways to install a travel eSIM:
(1) Install by scanning the QR code
(2) Install by uploading an image
(3) Install manually using the SM-DP+ address and activation code
2.1.1. Instructions for installing an international travel eSIM on a Samsung by scanning the QR code
- Step 1: Go to Settings > Select Connections
- Step 2: Tap SIM Card Manager
- Step 3: Select Add eSIM and scan the eSIM QR code sent to you by SIM2GO

Installing travel eSIM on a Samsung by scanning the QR code
2.1.2. Instructions for installing an international travel eSIM on a Samsung by uploading an image with a QR code
- Step 1: Go to Settings > Select Connections
- Step 2: Tap SIM Card Manager
- Step 3: Select Add eSIM
- Step 4: Tap the image icon in the bottom right corner, then upload the image containing the eSIM QR code, and you’re all set!
Installing travel eSIM on a Samsung by uploading an image with the QR code
2.1.3. Instructions for installing an international travel eSIM on a Samsung manually
- Step 1: Go to Settings > Select Connections
- Step 2: Tap SIM Card Manager
- Step 3: Select Add eSIM
- Step 4: Tap Enter Activation Code
- Step 5: Enter the LPA code sent by SIM2GO along with the eSIM QR code, and you’re all set!

Installing travel eSIM on a Samsung manually
2.2. Instructions for turning on Data Roaming on a Samsung (to be done after landing at your destination)
- Step 1: Go to Settings > Select Connections
- Step 2: Tap Mobile Networks
- Step 3: Turn on Data Roaming, and now you’re ready to explore the world with SIM2GO!

3. How to install a travel eSIM and turn on international roaming on a Google Pixel
3.1. Instructions for installing an international travel eSIM on a Google Pixel (requires an internet connection)
For Google Pixel phones, there are two ways to install a travel eSIM:
(1) Install by scanning the QR code
(2) Install manually using the SM-DP+ address and activation code
3.1.1. Instructions for installing an international travel eSIM on a Google Pixel by scanning the QR code
- Step 1: Go to Settings > Network & Internet
- Step 2: Select SIMs
- Step 3: Select Add eSIM and scan the eSIM QR code sent to you by SIM2GO

3.1.2. Instructions for installing an international travel eSIM on a Google Pixel manually
- Step 1: Go to Settings > Network & Internet
- Step 2: Select SIMs
- Step 3: Select Add eSIM
- Step 4: Select Enter Details Manually
- Step 5: Enter the SM-DP+ address and activation code sent by SIM2GO with the QR eSIM

3.2. Instructions for turning on Data Roaming on a Google Pixel
- Step 1: Go to Settings > Network & Internet
- Step 2: Select SIMs
- Step 3: Select the travel eSIM you have installed on your device
- Step 3: Turn on Use this SIM > Turn on Mobile Data > Enable Data Roaming, and you’re all set!

One of the most trusted international travel eSIM providers in Vietnam is Sim2Go.vn. It offers a wide range of international eSIM plans for over 200 countries and frequently offers special promotions, ensuring you stay connected comfortably while saving on costs during your trip abroad. Visit the SIM2GO website now to choose the best eSIM plan for your journey!